Using a Cordless Circular Saw Using a Cordless Circular Saw
Just about anything you want to build is going to take some type
of a cutting tool to shape the boards to the size and dimensions
you’ll need for a wood project. A circular saw is a good choice for the job, for a couple reasons. Price—you
can usually pick up a decent circular saw for under $50 that will
do just about anything a more expensive saw can do. You might eventually
want to look at buying a table saw, that is when you’re ready
to spend $500 (or more) for that kind of tool. But for now, a circular
saw will handle most of the cutting tasks you’ll be facing…and
at a fraction of the cost. Let’s take a closer look at what
I’m talking about.
What you CAN do with a circular saw
Ninety percent of everything you do with a saw is related to simply
cutting off the end of a board. Most of the wood we talk about at
ezwoodshop.com is sold in standard lengths…like 6 feet, 8
feet, 10 feet, etc. Not very likely that what you’re building
will be those exact dimensions. Not to mention the fact that you’ll
almost always want to make your own cuts across the ends of boards
you bring home from the home center, just too clean up the rough
edges that usually come with store-bought boards. Where the circular
saw really shines, though, is cutting plywood. There’s really
no better tool to cut down the large, bulky panels into pieces that
you can get your hands on. And you certainly won’t be limited
to cutting wood only. Just take a look at the different circular
saw blades on the shelf at a home center. You’ll find plastic
and vinyl cutting circular saw blades, metal cutting circular
saw blades, and tile cutting circular saw blades.
What you CAN'T do with a circular saw
Circular saws cut straight lines. So the obvious limitation is
that you can’t make the blade stray much from a straight path.
If you try cutting curves , you’ll find your saw getting pinched
and bound up in the wood, and that’s a dangerous situation
to be in. Circular saws are for straight lines, so keep it that
way. The only other real limitation with a circular saw is in cutting
joinery. Not that you can’t make some useful, strong joints,
similar to what you can make on a table saw, but your choices are
more limited. On our circular saw joinery page, we’ll show
you a few choices. For example, circular saws work fine for cutting
lap joints, that is if you’re willing to cut out some of the
wood with a hand chisel. They may not be the smoothest joints, but
perfectly suitable for things like backyard decks and patio furniture.
Corded vs. Cordless
If you’re trying to save some money, a simple (and cheap)
circular saw with a cord will pretty much do everything a cordless
saw will do. My only complaint is that cheap circular saws are heavy
and noisy, and usually have a larger blade than I like or need to
use. I really can’t think of any projects around the house
(or outside) that need a 7 ¼ inch blade, which seems to be
standard size with cheap circular saws. That’s a huge blade
spinning around inside that little plastic housing, which can easily
go astray if you’re not careful (see my safety tips). If you
need more convincing, just try picking up one the smaller-bladed cordless circular saws (5 ½”) at a
home center and you’ll probably agree with me that for most
projects around the house, you simply don’t need a construction-site
work hog with a bulky power cord dragging behind you. The smaller
5 ½ blade cordless models are easier to handle and easily
tackle just about any job you can throw at them. The good news about
all cordless power tools is the new lithium-ion batteries, which
have much more power and stamina than the cordless tool sets that
were on the shelf just a few months ago.
Out of the Box
Most circular saws are ready to go straight out of the box. You’ll
have to install the blade, and your instruction booklet will go
over all that and anything else unique about your model. I know
it’s tempting to toss that stuff aside and just get started
with your first cut, but at least give the booklet a quick skim
through. More than likely your saw will have some features that
you’ll completely miss if you don’t look them up in
the manual (more mystery buttons on tools that you never understood
the purpose of).
Basic Cuts
Crosscuts
A circular saw is the perfect tool for cutting boards to length
(crosscuts). Even with more expensive saws in their pickups, carpenters
always bring along a circular saw for quick and easy cuts. It’s
really hard to beat the simplicity of tossing a 2x4 across some
sawhorses and cutting the board to length. And when you gang up
several boards together for the same cut, you’ll really start
to see the advantages in using a circular saw. Probably the best
way to make crosscuts is with a crosscut jig of some sort…and
in the ideal world, with both hands on the saw while you cut. Of
course this means clamping your board down on something like a sawhorse
or a table before you start to cut, a step that most of you will
probably skip. But let me add my opinion here and say that clamps
can be life savers…in more ways than one. If you’re
just getting started building things with power tools, you’ll
eventually figure out what I’m talking about. You can build
crosscut guides yourself, or check out the manufactured crosscut
guides made especially for circular saws.
Ripping
Cutting boards to width with a circular saw is a little more tricky
than using a table saw, but it can be done. With a simple ripping
guide (shooting board) you can still get clean, straight edges on
boards with a little careful clamping on your sawhorses or work
table. You can make your own ripping guide without too much trouble,
and usually with some scrap lumber from your shop. Or buy a really
nice metal ripping guide from an online woodworking supply store,
like Rockler.com. Both will get the job done, just about as well
as using a table saw.
Panel Cutting
Plywood panels are what circular saws are really made for. Even
if you had a table saw in the shop, you’d still be reaching
for a circular saw to cut plywood panels. Plywood is just too big
and cumbersome to cut with any other type of saw. How you go about
cutting panels opens up a few options. Most are happy to plop the
panel on the floor and get down on their hands and knees and push
the saw along the lines they’ve drawn…that is, while
they try to shimmy their own bodies across the board at the same
time. It’s not the most delicate method, but it seems to get
the job done. You can make things a little easier by first putting
down a sheet of Styrofoam. This will keep your panel up off the
floor just enough to keep your blade from hitting concrete. The
only drawback to this method is, well, first you have to buy the
Styrofoam somewhere and then try to get it home without it flying
out of the back of your truck. If you can do that, then this is
not a bad method really for cutting plywood. Of course, when you’re
done cutting, you have to find a place to store the Styrofoam when
you’re not using it. Oh well. Another option is to make a
plywood cutting station on a pair of sawhorses. This may seem like
a little more work, but it’s a nice way to get your work up
off the floor…and save your knees some punishment. Still,
another option is to build a plywood cutting station, sort of like
the panel cutting stations you see at the home centers. Yours doesn’t
have to be this fancy, but there are a few versions you can build
that serve the same purpose.
Outdoor Construction
The circular saw is probably the most common tool you’ll
see around construction sites. That’s because it’s the
most portable saw of its kind.
Safety
Unfortunately, tools that are quick and easy to use (like the circular
saw) are also the most dangerous. The small, lightweight case deceptively
hides a deadly wheel of razor-sharp teeth, spinning nearly out of
control behind a thin plastic cover. As tempting as it may be to
use one hand, this is always a risky proposition. There’s
enough horsepower behind the saw blade to send everything flying
back towards your stomach if the blade should happen to bind in
the wood. So my number one safety rule for circular saws is to clamp
down your workpiece whenever you possibly can. I know it won’t
happen with every cut you make, but try to make it a habit so you
can eventually come up with a few quick and easy set ups for clamping
your work.
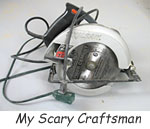
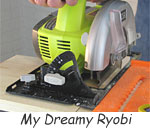
Ryobi Saw - Cordless Ryobi One 18v Lithium 4 Pc Combo Tool Kit P843 Circular Saw
I
have an old, beat up craftsman circular saw in my basement that my dad gave me. It never
has felt very good in my hands, kind of like
it was made for someone else - someone who
works outside all day framing houses and building
decks. So I never use it much.
To be honest, it kind of scares me. It's heavy, loud, and tears through
wood with what seems to be enough force to
slice concrete. Do I really need that much bulk and power just to cut up 2x4s in
the garage? I often ask myself that question,
but I keep on trying to make the best of the
tool I got for free. Maybe I just didn't know
any better.
Until
now. On my most recent tool-gazing
trip to Home Depot, I finally gave in and
plopped down the cash for Ryobi
One 18v Lithium 4 Pc Cordless Combo Tool Kit
P843, which includes the circular saw
you see in the photo above. Oh my gosh...what
a dreamy shop tool this thing has turned out
to be. My poor Craftsman may never see the
light of day again.
For starters, let's just talk about the
mere size of the Ryobi. Like I mentioned,
I've always thought a typical 7-1/4"
circular saw is overkill for most projects
around the house. The smaller Ryobi has proved
my point very well. With the saw set at maximum
depth, the 5-1/2" blade cuts though any
2x dimensional lumber you can find on the
shelf.
  With
the smaller, 5 - 1/2" blade, sometimes
a 45-degree bevel puts the blade just a hair
shy of cutting completely though some 2x boards,
probably because construction lumber can vary
in thickness. All that means is that I sometimes
have a little cleaning up to do on the cut
line.. With
the smaller, 5 - 1/2" blade, sometimes
a 45-degree bevel puts the blade just a hair
shy of cutting completely though some 2x boards,
probably because construction lumber can vary
in thickness. All that means is that I sometimes
have a little cleaning up to do on the cut
line..
But with the smaller size comes less weight.
This might be the most profound difference
I noticed between the Ryobi and my old Craftsman
workhorse. In stark contrast, the Ryobi is
compact, lightweight, much quieter, and just
plain better looking.
Unlike my Craftsman, I
probably can't leave the Ryobi outside in
the rain and expect it to work the next morning.
Also, I don't expect the Ryobi could survive
a hard fall from my bench or sawhorse without
something breaking. Most of the outer casing
is made of plastic, and it looks like the
blade guard would be the first to go. That's
okay with me though. I like to be careful
with my tools. I don't let things fall from
my bench.
Avoiding Pinched Cuts
Just about every 8-foot board I bring home from the store gets cut down to size in my shop. And I like to get them cut as quick as possible because I don't really have a good place to store long boards. So my temptation is to just lay the board across two loosely-propped-up things (like a garbage can and a chair with some books on it) and grab my circular saw. That's where it all goes wrong.
Just when I think I've cut all the way through the board, my blade starts to slow down and make a strange grinding sound.
Soon after my saw does one of two things; 1) the blade comes to a screeching halt and is jammed so tight into the wood I can't pull it out, or 2) the saw jumps up and away from the board.kind of like it wants to shoot back towards me. That's scary.
Eventually I figured out what was going on. My saw blade is getting pinched. That's because laying a board across two loosely-propped-up things won't keep a board stable enough to make a clean cut. Here's why: As the saw blade starts to separate a board into two pieces, one side will inevitably want to drop while the other side rises. Ever try to cut off a tree branch? It's the same problem. If you can't secure both sides of the stick (or in this case the board), things will start to collapse around the blade as you reach the end of the cut.
It's an easy fix, though. Just clamp everything down first. That means putting clamps on both the left and right side of the cut line (preferably two on each side). It also helps to find a better work table than the loosely-propped-up things I reach for. My favorite choice these days is a simple pair of saw horses. The best thing about using saw horses is that each side of your board is supported at the same height. That's important. Clamping a board down to something that's not level will add tension to the board. What happens then? Just like before, when you get to the end of the cut one side of the board goes up, the other goes down. And that means another pinched blade.
Clamping also frees up one of your hands...the one you normally use to keep the loosely-propped-up things from toppling over. With those weird acrobatics out of the way, you can put your concentration where it should be.on your saw. |